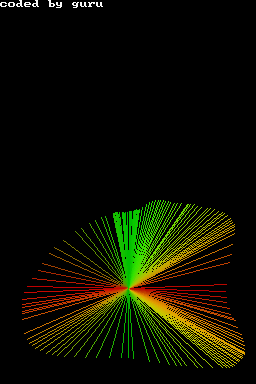
nds line-demo
Since my first demo for the Nintendo DS used the bresenham circle algorith, i had to write another starring its famouse brother - the bresenhaml line-algorithm. Which is a bit trickier than it seems when you first look at it. it took me 4 tries to make it work in all quadrants.
For those of you who don't own a nds i included a screenshot this time made using a emulator. imagine the upper part of the screenshot beeing displayed on the upper screen of the DS.
#include <nds.h>
#include <stdio.h>
#include <stdlib.h>
#include <unistd.h>

void setPixel( int x, int y, int color ) {
    VRAM_A[x + y * 256] = color;
}

void line( int x1, int y1, int x2, int y2, int c ) {
    bool swap = abs( y2 - y1 ) > abs ( x2 - x1 );
    int x1t =  swap ? y1 : x1;
    int y1t =  swap ? x1 : y1;
    int x2t =  swap ? y2 : x2;
    int y2t =  swap ? x2 : y2;

    int xs =  x1t < x2t ? x1t : x2t;
    int ys =  x1t < x2t ? y1t : y2t;
    int xt =  x1t < x2t ? x2t : x1t;
    int yt =  x1t < x2t ? y2t : y1t;

    int dx = xt - xs;
    int dy = abs(yt - ys);

    int dT = 2 * ( dy - dx );
    int dS = 2 * dy;
    int d = 2 * dy - dx;
    int x = xs;
    int y = ys;

    if ( swap )  {
        setPixel( y, x, c );
    } else {
        setPixel( x, y, c );
    }

    while ( x < xt ) {
        x++;
        if ( d < 0 ) {
            d = d + dS;
        } else {
            if ( ys < yt ) {
                y++;
            } else {
                y--;
            }
            d = d + dT;
        }
        if ( swap )  {
            setPixel( y, x, c );
        } else {
            setPixel( x, y, c );
        }
    }
}

int main(void) {
    touchPosition touch;
    // set lower screen to FB
    videoSetMode(MODE_FB0);
    vramSetBankA(VRAM_A_LCD);

    // set upper stcreen to textmode
    videoSetModeSub(MODE_0_2D | DISPLAY_BG0_ACTIVE);
    vramSetBankC(VRAM_C_SUB_BG);
    SUB_BG0_CR = BG_MAP_BASE(31);
    BG_PALETTE_SUB[255] = RGB15(31,31,31);
    consoleInitDefault((u16*)SCREEN_BASE_BLOCK_SUB(31), (u16*)CHAR_BASE_BLOCK_SUB(0), 16);

    iprintf("coded by guru
");
    // make sure main screen is on bottom
    lcdMainOnBottom();

    while(1) {
        scanKeys();

        if(keysHeld() & KEY_TOUCH) {
            touch=touchReadXY();
            line( 128, 96, touch.px, touch.py, RGB15(
                31 * abs(touch.px - 128) / 128,
                31 * abs(touch.py-96) / 96,
                0
            ));
        }

        // clear screen if key A is pressed
        if (keysHeld() & KEY_A) {
            for ( int y = 0; y < 192; y ++ ) {
                for ( int x = 0; x < 256; x ++ ) {
                    setPixel( x, y, 0);
                }
            }
        }
    }
    return 0;
}
first nds demo
I got a nintendo DS 2 weeks ago and have hacked my first demo using the arm compilers from devkitPro. To compile the code follow the drunkencoders-Tutorial.
the program initializes the lower screen in a 2d graphics mode, and draws a circle (using the bresenham-algorithm for circles) wherever the screen is touched by the stylus. if the A button is pressed the screen is cleared. No sophisticated doublebuffering, 3d or sound stuff this time - but hey! it's the first program for a nds! and it works! :-)
#include <nds.h>
#include <stdio.h>
#include <stdlib.h>
#include <unistd.h>

void setPixel( int x, int y, int color ) {
    VRAM_A[x + y * 256] = color;
}

void circle( int mx, int my, int r, int color ) {
    int x = 0;
    int y = r;
    int d = 3 - 2 * r;

    while (x <= y) {
        setPixel( mx  + x, my + y, color );
        setPixel( mx  - x, my + y, color );
        setPixel( mx  - x, my - y, color );
        setPixel( mx  + x, my - y, color );
        setPixel( mx  + y, my + x, color );
        setPixel( mx  - y, my + x, color );
        setPixel( mx  - y, my - x, color );
        setPixel( mx  + y, my - x, color );

        if (d < 0) {
            d = d + 4 * x + 6;
        } else {
            d = d + 4 * ( x - y ) + 10;
            y --;
        }
        x++;
    }
}

int main(void) {
    touchPosition touch;

    videoSetMode(MODE_FB0);
    vramSetBankA(VRAM_A_LCD);

    lcdMainOnBottom();

    while(1) {
        scanKeys();

        if(keysHeld() & KEY_TOUCH) {
            touch=touchReadXY();
            circle( touch.px, touch.py, 20, rand());
        }

        if (keysHeld() & KEY_A) {
            for ( int y = 0; y < 192; y ++ ) {
                for ( int x = 0; x < 256; x ++ ) {
                    setPixel( x, y, 0);
                }
            }
        }
    }
    return 0;
}