
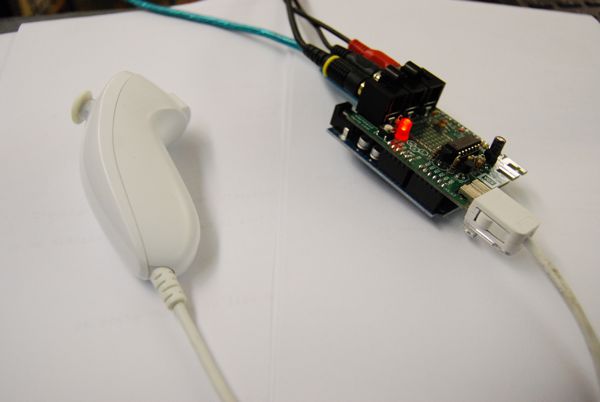
Getting Started with the VideoGameShield
The VideoGameShield from Wayne&Layne is a arduino-shield that allows you to write videogames that run on your TV using an arduino and a Wii-Nunchuck or Classic Game Controller.
This is a short tutorial that helps you on your first steps after you have solderd your kit following these instructions.

To draw on the screen the VGS uses the TVout library. In this example I use a Nunchuck as controller. first we include all the libraries that are needet to use TVout and Nunchuck
#include <TVout.h>
#include <fontALL.h>
#include <i2cmaster.h>
#include <nunchuck.h>
then we define the structures we need to access the libraries
Nunchuck n;
TVout TV;
in the setup()-method we initialize the screen, select a font and print a message string for 2 seconds. Then we clear the screen. We also initialize the Nunchuck connected to the Player1 port.
void setup() {
  TV.begin( PAL, 120,96 );
  TV.select_font(font8x8ext);

  n.begin(NUNCHUCK_PLAYER_1);

  TV.clear_screen();
  TV.println("Hello World!\n");
  TV.delay(2000);
  TV.clear_screen();
}
Then we define some variables to store the current position of a short line we will draw on the screen, that can be moved using the cursor.
unsigned char old_x = 0;
unsigned char old_y = 0;
unsigned char x = 60;
unsigned char y = 48;
in the loop()-methdo we call TV.delay_frame(1) and TV.clear_screen() to initalize the screen for this frame.
void loop() {
  TV.delay_frame(1);
  TV.clear_screen();
Then we select a 8x8 font and print some instructions
  TV.select_font(font8x8);
  TV.println("Press Buttons!\n");
Update the state of the Nunchuck object and test if any of the buttons has been pressed.
  n.update();
  TV.select_font(font6x8);
  if( n.button_c()) {
    TV.println( "C-Button pressed\n");
  }
  if (n.button_z()) {
    TV.println( "Z-Button pressed\n");
  }
Than test if the joystick has been moved and draw a little line from the last position to the new position.
  old_x = x;
  old_y = y;

  if (n.joy_up() && y > 0) y--;
  if (n.joy_down() && y < 96) y++;
  if (n.joy_left() && x > 0 ) x--;
  if (n.joy_right() && x < 120 ) x++;

  TV.draw_line(old_x, old_y, x, y, WHITE );
}
Now compile and run your arduino program as usual, hook up the gameshield to your TV and your Nunchuck and enjoy your first VGS Arduino Sketch


See also:
How to modulate Midi-CC values in Bitwig Studio
Bitwig SpaceReverb
particle emitting particles - tutorial
YesNoBot
the setup()-method we initialize the screen, select a font and print a message string for 2 seconds. Then we clear the screen. We also initialize the Nunchuck connected to the Player1 port.Great piece of information.